
Bretz Archives
Page Navigation
- Signature Practice
- Line
- Shape
- Form
- Color
- Value
- Texture
- Space
- T1 Art
- Art Storage
- Product Development Advertising Campaign
- Art
- History
-
Spanish
- Spanish Storage
- Greetings Vlog
- Why Learn Spanish?
- alphabet
- los saludos
- los colores y las formas
- el calendario
- los números
- Review T1
- IBMYP - Greetings Vlog
- la escuela
- el tiempo (weather)
- la casa
- el cuerpo
- la ropa
- la familia
- Review T2
- la comida
- las frutas
- las verduras/los vegetales
- Restaurant Skit
- la granja
- los animales
- la transportación
- -ar Verbs
- -er Verbs
- -ir Verbs
- días festivos
- los deportes
- Spanish Quizzes
- Bingo Board
- Grammar Practice
- Unit 1.1 - Body Systems
- Unit 1.2 - The Cell as a System
-
Color Wheel
-
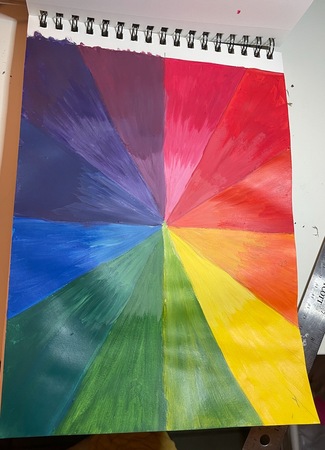
Color Wheel Project
Due Date: Friday, February 5th
Directions:
Step 1- Making the Color WheelGather your supplies:
art journal
pencil
ruler
brush
water for cleaning brush
paper plate for mixing paint
paint (red, yellow, blue, white & black)
*If you do not have paint, you may use crayons, watercolor, markers or colored pencils.
In your art journal, draw lines across the page using a pencil. (see example)
Lightly write out all 12 colors in each triangle.
If you are not sure, use the Color Theory worksheet as a reference.
In the middle of your paper plate, add a quarter sized blob of each primary colors (red, yellow, blue).
Using these primary colors, carefully mix your secondary colors.
Mix your tertiary colors (primary + secondary). Use the photo below as a reference.
Optional: If you want to add white to each color you can fill the first ⅓ of the triangle with your tint color.
Paint each triangle on the color wheel making sure to follow the correct color order.
If you are not sure, use the Color Theory worksheet as a reference.
Remember to clean your brush thoroughly between colors to ensure a vibrant color wheel.
Fill the entire page with color and let dry completely before moving on to Step 2.
Step 2 - Adding clippings to your color wheel.Gather Supplies:
glue or glue stick
scissors
any colorful magazine, photo, mailer, flyer or illustrations
Carefully cut out your clippings using scissors.
Find images of items in all colors.
Once you have gathered all your clippings, glue them down to the corresponding color on the color wheel.
Try to fill your color wheel with images representing each color.
Take a photo (make sure it is clear and bright) and submit to Google Classroom by the due date.
STEP 3: Complete the Reflection FormSend the Reflection form (BELOW) to Notability or print it out.
Fill out each section in complete sentences.
Submit the Reflection along with the photo of your final color wheel to Google Classroom.
RUBRIC:
STEP 1- Color Wheel with correct colors + 12 pts.STEP 2- Clippings added to each color (minimum of 3 clipping per color) + 12 pts.
STEP 3- Reflection Form + 10 points
TOTAL + 34 points
-
Basic Color Theory
-
Color Wheel Sample
-
Mixing Color